To conclude our “Strawberry Week,” I thought I’d share some links to a few fun strawberry recipes I’d like to try soon!


Is your mouth watering yet? Happy strawberry picking!
a blog about faith, family, food, & more written by a wife and stay at home mom of five
To conclude our “Strawberry Week,” I thought I’d share some links to a few fun strawberry recipes I’d like to try soon!
Is your mouth watering yet? Happy strawberry picking!
I guess I should have dubbed this “Strawberry Week” at Feathers in Our Nest!
My mom (Mrs. B.) is here with us today for a special guest post! She is sharing how to make homemade strawberry freezer jam. I can personally attest that this recipe is awesome and everyone always raves about how delicious it is. Hope you enjoy it!

Strawberry Freezer Jam

Wash and dry all jars/lids or containers you will be using to put jam into.

Wash all strawberries (while caps are still on so they don’t get mushy).


Cut caps and any bad spots off of strawberries.


Put strawberries into a bowl and mash them…do not puree them…just mash them thoroughly…there should still be bits of fruit in the juicy mixture. (I use a metal potato masher.)

Measure 4 cups of mashed strawberries into a bowl.

In a large pot, measure 3 cups of sugar (be very accurate in this measuring as too much or too little sugar will affect your outcome negatively).


Mix these together.

Add one cup of water to sugar mixture.

Mix thoroughly and put on medium to med. high heat.

Bring to boil. After it begins to boil, let it boil for one minute.


Remove from heat and add 4 cups of mashed strawberries.

Mix thoroughly for one whole minute.

Using a ladle, put jam into jars, leaving 1/2 inch at the top for expansion when it freezes.
Wipe off top and sides of jar if any jam is there. Put lids on.

Thanks, Mom/Mrs. B for sharing this wonderful recipe with us today!

Warning: this recipe is not healthy and may be slightly addictive. 🙂 Wait, strawberries are fruit, so that makes this healthy…right?
Strawberry pie is a dessert I remember my mom making every year (just about!) during strawberry season. The pie has a unique, sweet crust (different than a standard pie crust) which is super-easy to make since you just press it into the pie plate instead of rolling it out! Fresh strawberries fill the inside of the pie, and since you do not bake them, they stay firm and juicy, just like eating them straight from the patch! Of course you’ll want to serve this pie with a large dollop of whipped cream.
Fresh Strawberry Pie
Crust
1/2 cup butter, cold
1 cup flour
2 Tbsp. granulated sugar
Filling
about 2-3 cups fresh strawberries
1 (3 oz.) package strawberry Jello
3/4 cup granulated sugar
2 1/2 Tbsp. cornstarch
1 3/4 cups boiling water
2 Tbsp. butter

Wash strawberries in a colander.


In a mixing bowl, combine butter, flour, and sugar together using a pastry cutter or a knife and fork.

Mixture will resemble coarse crumbs.

Preheat oven to 375. Lightly grease a pie plate. Press flour mixture into the pie plate. As you press in the crumbs, your hands will soften the butter and allow it to come together, forming a relatively smooth crust. (It might still look a little bumpy, but that’s okay.)
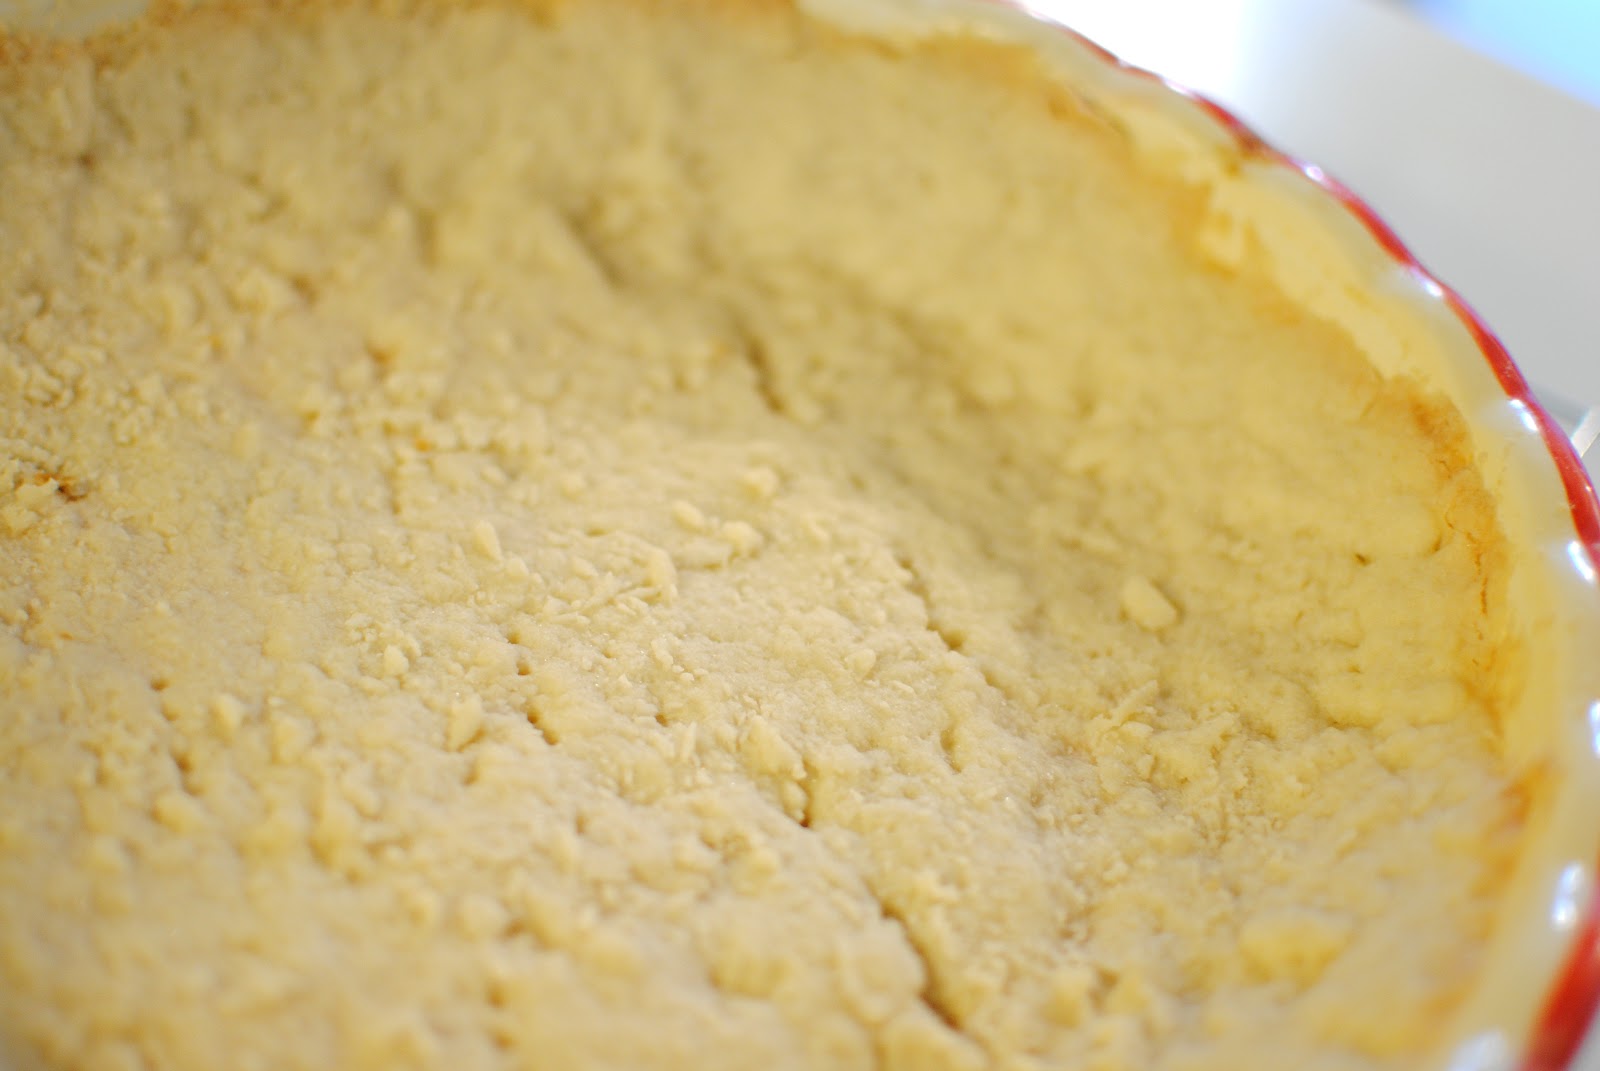
Bake the crust just until the edges are very lightly browned (about 12-15 minutes). Allow crust to cool.

While the crust is cooling, you can work on the glaze. In a saucepan, combine Jello, sugar, and cornstarch (no heat on).

In another saucepan, boil 2 cups of water.

When the water boils, measure out 1 3/4 cups and add it to the Jello mixture in the other saucepan. Return that saucepan to the heat (turn it down to medium) and whisk it while it cooks. Stir constantly and cook until glaze has thickened (about 5-7 minutes). (If you happen to leave the stove at this point to go discipline a cranky toddler, it will be okay. Just stir it pretty frequently.)

Remove from heat and add butter, whisking until butter is melted and combined. Allow glaze to cool until no longer hot (does not need to be cold).

Once crust is cooled, place strawberries pointed ends up inside the pie crust. (They are so much prettier this way than sliced!)

Spoon cooled glaze over top of the strawberries in your prepared pie dish, making sure all the berries are coated. (I find that using a spoon more evenly distributes the glaze than if I just poured it over from the bowl.)
Chill pie in the fridge until set (about 2-3 hours).

Slice and serve with whipped cream!
Enjoy!
Like this recipe? Follow me so you never miss a new recipe post!
For more of our family’s favorite recipes, click here.
Linked to:
Tasty Tuesday
Tempt My Tummy Tuesday
Tuesdays at the Table
Tuesday Night Supper Club
Tatertots & Jello "Pin It")
At Feathers in Our Nest, you can expect to find delicious recipes, homemaking tips, practical advice for frugal living, resources for those who are in ministry, inspiring links, and cute photos and stories about our children. You can browse older posts by checking out the Tips & Tutorials Page or the Recipes Page. Thanks for visiting! Read More…