Feathers in Our Nest

a blog about faith, family, food, & more written by a wife and stay at home mom of five

  • Home
  • About
  • Recipes

Delicious Roasted Broccoli

June 16, 2014 by Aliesha

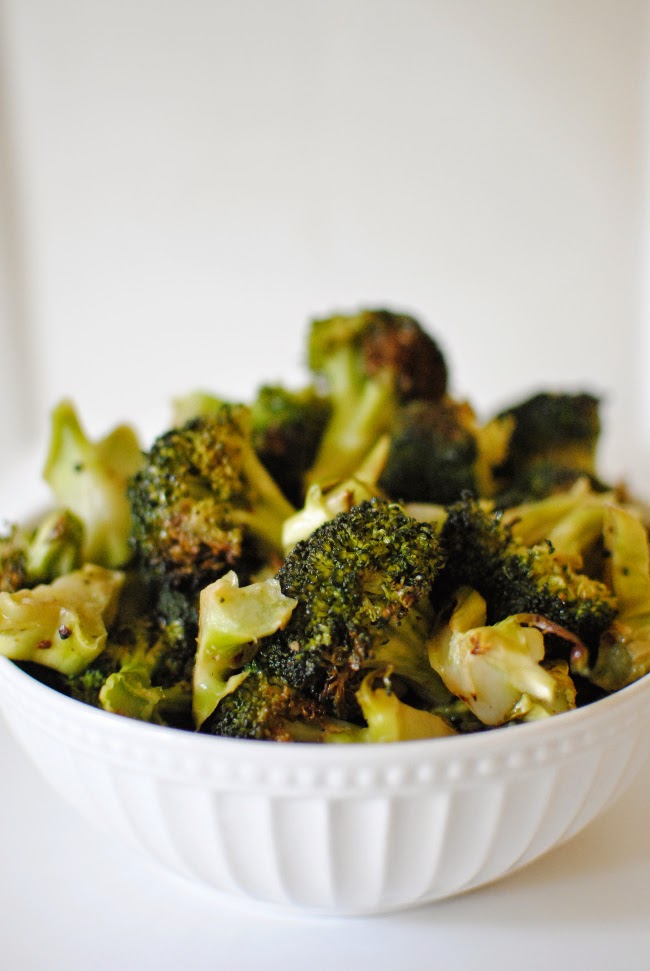
If you (or your kids) think you don’t like broccoli, you have to try making it this way!  Roasting vegetables really makes them taste delicious, and this is by far our family’s favorite way to eat broccoli!  The girls devour it, especially CC.  We usually have to cut her off or she would eat it all!

Because this really heats up the kitchen in the summer, I like to do multiple things in the oven at once.  I’ll roast enough broccoli for two meals, plus another vegetable, and a head of garlic as well.  Or I’ll do it after I’ve baked bread and the oven is already hot.  In the winter, though, this is a nice way to warm up the kitchen!


Delicious Roasted Broccoli
 
Print
You'll never go back to steamed broccoli after trying it this way! So much flavor!
Author: Aliesha @ Feathers in Our Nest
Recipe type: Side Dish
Ingredients
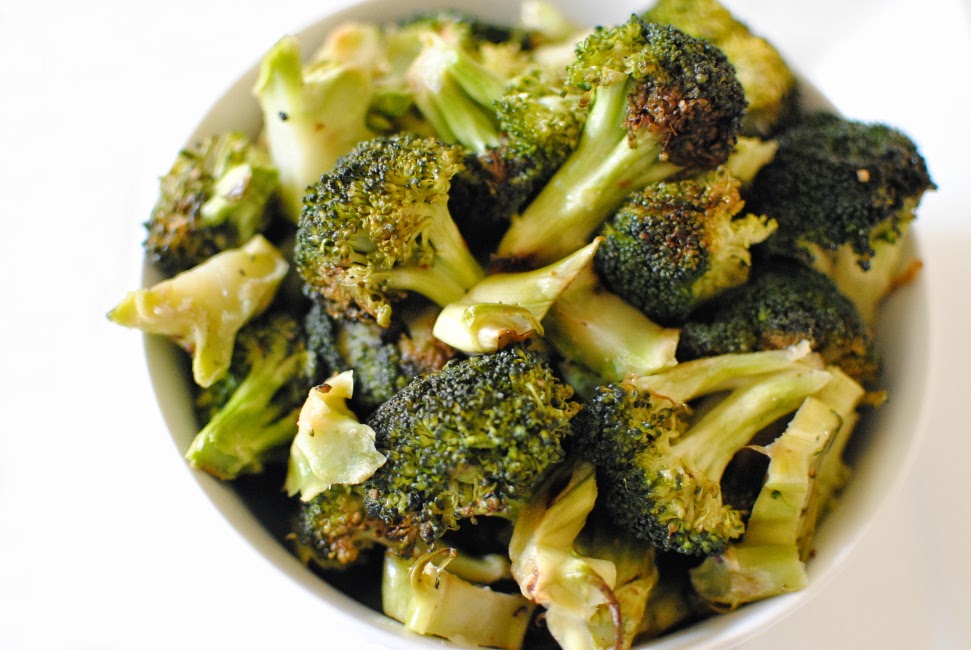
  • broccoli or broccoli florets
  • olive oil (can use another oil, such as coconut oil or lard from a local farm)
  • salt & pepper
Instructions
  1. Heat oven to 400 degrees.
  2. Line a baking sheet with foil (for easy clean up).
  3. Chop broccoli (stems and all) into bite-sized pieces.
  4. Place on a single layer on the baking sheet.
  5. Drizzle with olive oil, toss, sprinkle with sea salt and pepper, and toss again.
  6. Roast until fork tender and lightly browned on edges, tossing once while baking.  It usually takes 15-20 minutes for me, but it varies based on the side of your pieces and how full your baking sheet is.
  7. Taste, then add more salt if needed.
3.2.2929


Other fun additions:

-sprinkle with Aleppo pepper before baking
-add chopped shallots to the broccoli before roasting
-after roasting, toss in a flavored olive oil (like garlic or wild mushroom sage)
-after roasting, drizzle with the juice of one lemon and some finely shredded Parmesan cheese

Enjoy!

*This recipe reheats very well.  The broccoli doesn’t get mushy!

**You can roast other vegetables like this too!  I’ve done cauliflower, carrots, green beans, eggplant, and more!

Like this recipe? Follow me on facebook so you never miss a new recipe post!
For more of our family’s favorite recipes, click here.

Filed Under: food, recipes, side dishes

DIY Vanilla Extract

June 12, 2014 by Aliesha

Two years ago, I made vanilla extract for the first time.  It was so fun and easy!  I’ve been using it since then and giving it away as gifts.  It was time to make a new batch, so I searched around for a great source for vanilla beans.

I discovered Beanilla, and I’m so glad I did!  Their beans are high quality and reasonably priced.  They have a great selection of vanilla bean varieties.  I used their Madagascar beans for this latest batch of vanilla extract, and it smells so amazing!

I have two more recipes coming up soon that use these beans, so keep an eye out for those in the next couple of weeks.

It’s very simple to make vanilla extract, plus you know that it is pure (with no artificial flavorings or added sugar).  Even Vera joined in on the process!

DIY Vanilla Extract   (Printable recipe here.)

vanilla beans (I used Madagascar Bourbon Vanilla Beans from Beanilla – current price is $25 for 25 beans)
vodka, 35%+ alchohol, 70+ proof (or rum, but I haven’t personally tried that)
cutting board
sharp knife
liquid measuring cup
funnel
swing-top glass bottles
(optional) amber glass bottles for gift-giving (check out the whole bottle selection here)

Slice vanilla bean pods lengthwise to reveal the beans inside (no need to cut all the way through).

Place 5-7 beans per 8 ounces of alcohol into each bottle.

Kids can help with this step!

Pour alcohol into bottle using measuring cup and funnel.

Make sure the beans are fully covered.

Close the lids, give the bottles a good shake, then store in a cool, dark place for at least 8 weeks (longer is great too!).  I really like to let mine mellow for around 3-6 months for a maximum depth of flavor.

Shake the bottle every day or so for the first week, then once a week after that.

When the vanilla has “aged” long enough, the color will be dark* and it will smell fantastic!

*In the photos below, the vanilla has only been aging for about five weeks.

If desired, you can transfer vanilla extract to small bottles for gift giving or storage.

This makes a great Christmas gift for anyone who likes to bake a lot!  Start your extract now so it’s ready for the holiday season!

Disclosure:  I received vanilla beans from Beanilla at no charge in order to facilitate this review and tutorial.  All other supplies were purchased personally. My opinions are completely my own.

Filed Under: food, gift ideas, miscellaneous, projects, recipes

Whole Wheat Cranberry Zucchini Bread

June 9, 2014 by Aliesha

This post has also been posted on Baking Whole Grains, a site I write for which compensates me for sharing whole grain recipes.  While I receive compensation, this does not influence my opinions.  All photos and directions are my own. 

Around the holidays, I always buy a few extra bags of cranberries when they are on sale to save for recipes like this one!  The tart pop of winter berries pairs so well with the sweetness of honey in this bread.  It’s a great way to enjoy the summer bounty of zucchini as well!

You won’t feel guilty eating this bread for breakfast since it’s made with whole grains, natural sweeteners, zucchini, and cranberries.  It’s a great way to feed all those things to your kids as well!

adapted from here


Whole Wheat Cranberry Zucchini Bread
 
Print
Cook time
50 mins
Total time
50 mins
 
Author: Aliesha @ Feathers in Our Nest
Recipe type: Bread
Serves: 1 loaf
Ingredients
  • 2 cups whole wheat flour, freshly ground
  • 2 eggs
  • ⅓ cup honey
  • ½ cup olive oil
  • ⅓ cup sucanat or brown sugar
  • 1 tsp. vanilla extract
  • 1 tsp. salt
  • ½ tsp. baking soda
  • ½ tsp. baking powder
  • 2 cups shredded, unpeeled zucchini
  • 1 cup cranberries (frozen or fresh)
Instructions
  1. Grind wheat in the WonderMill.  Preheat oven to 350 degrees.  Grease a loaf pan.
  2. In a bowl (or the base of a stand mixer), combine eggs, honey, olive oil, sugar, and vanilla.  When mixed, add salt, baking soda, baking powder, and flour.
  3. Fold in (by hand) zucchini and cranberries, mixing just until combined.
  4. Pour batter into the prepared loaf pan.  Bake for 50-60 minutes until golden brown, top is slightly cracked, and a toothpick inserted in the center comes out clean.
  5. Remove from pan and cool on a wire rack completely before slicing.
3.3.3077

Enjoy!

Pin it

For more of our family’s favorite recipes, click here.

Filed Under: baking whole grains, bread, breakfasts, recipes

  • « Previous Page
  • 1
  • …
  • 11
  • 12
  • 13
  • 14
  • 15
  • …
  • 62
  • Next Page »
  • Email
  • Facebook
  • Instagram
  • Pinterest
  • RSS
  • Twitter
About Us

This blog shares our family's story and our journey from newlyweds to a family of seven. We share milestones, we share struggles, we share sweet memories, and we share about our Savior. Keep reading...

FACEBOOK

NEWSLETTER

Subscribe to our super-fun weekly newsletter! Enjoy exclusive content & fun bonuses!

* indicates required

Archives

INSTAGRAM

PINTEREST

Visit Aliesha @ Feathers in Our Nest's profile on Pinterest.

Popular Posts

newborn sleep routine

10 Tips for Establishing a Newborn Sleep Routine

What I Buy at Aldi

What I Buy at Aldi {Real Food}

essential oil blends

Essential Oil Blends – What Works for What?

DIY Citronella Candles {Keep Mosquitoes at Bay!}

Dream Diaper Bag: Review of Lily Jade Shaylee

Baby Basics: Guide to the Products I Love

Perfect Cold Brew Coffee at Home! Easy DIY recipe using a French Press | Feathers in Our Nest

Perfect Cold Brew Iced Coffee

See Other Popular Posts...

About Feathers in Our Nest

At Feathers in Our Nest, you can expect to find delicious recipes, homemaking tips, practical advice for frugal living, resources for those who are in ministry, inspiring links, and cute photos and stories about our children. You can browse older posts by checking out the Tips & Tutorials Page or the Recipes Page. Thanks for visiting! Read More…

  • Email
  • Facebook
  • Instagram
  • Pinterest
  • Twitter

Recent Posts

Easter Family Devotions | Feathers in Our Nest
Gospel Centered Books for Older Kids | Feathers in Our Nest
Gospel Centered Family Devotionals | Feathers in Our Nest
Gospel Centered Story Bibles | Feathers in Our Nest
Gospel Centered Picture Books | Feathers in Our Nest

Popular Topics

baby baking whole grains birthdays books bread breakfasts Christmas cooking Cordelia crafts deals decorating desserts essential oils everyday fall family food friends frugal living giveaways health and beauty healthy eating holidays homemaking hospitality house Jude main dishes marriage menu monday milestones ministry parenting photography pregnancy projects recipes reviews she {hearts} it sponsored Tad travels Vera worth repeating

Copyright © 2025 · Foodie Pro Theme by Shay Bocks · Built on the Genesis Framework · Powered by WordPress

Sign up below to join the Feathers in Our Nest email list!
Every Friday, you'll get exclusive content: the latest posts, recipes, photos, & more!
Your information will never be shared or sold to a third party.